|
WordPress is a beloved Content Management System and blogging is a highly idolized profession. The two are millennial-favorite elements of the modern online world, and when combined, can help people monetize their passion. As of some Internet reports, there are currently more than 440 million blogs in the world. That’s a lot, right? The figure also points towards the mammoth online competition faced by all the existing blogs and even the new ones coming up. Since the viewership is divided among so many online resources, earning your blog’s fair share of traffic can be a tough task. Driving traffic to a blog has never been an easy or low-cost (whether in terms of money, time, or effort) endeavor. Some of the world’s most amazing blogs follow a full-fledged guide in order to drive traffic to their WordPress blogs. We have the guide for you, right here. Make your blog blazing fast
By this time, probably everyone knows that if your blog/website doesn’t load within three seconds, the blog abandonment ratio will be high, and that isn’t favored by search engines. A fast loading speed will make sure that your blog’s dwell time is substantial and that people readily visit your posts again and again. Regular blogging is the keySuccessful bloggers make sure that they put up stuff for their audience to see on a regular interval, as promised. When loyal readership begins to build on your blog, you will have to be disciplined by bringing up new content every time. If you are someone who has a hard time maintaining uniformity, WordPress’ Editorial Calendar plugin can be your solution. This plugin helps you schedule your next blog post and if need be, you can have a look at whatever you have planned for the next week or month. Publishing new blog content regularly will engage your followers when they come back to your blog looking for new stuff. Produce rich content
Every other effort of bringing traffic to your WordPress blog will fail if your content isn’t worth the audience’s time and online attention. You need to master your niche and come up with good blog posts, videos, infographics etc. that are unique to their core. Even if you are going to talk about something which has been excessively presented before by other blogs, make a point to strategize well in advance, produce rich content, use high-quality images and videos to garner attention and induce visual stimulation. Incorporate internal linkingWhen your blog visitors land on a specific post or page of your blog, they might take away the information from that specific resource and leave your website. Incorporating internal links, which point to other pages and content on your blog, will encourage visitors to follow those links instead and spend longer browsing your blog. This also boosts page views of your blog, helps your blog crawl and get indexed – improving your page rank. You can also put up ‘Featured Posts’ on your blog’s homepage which is a great way of promoting an existing post that already has a high number of page views and comments. Since this particular post on your blog has its fair share of popularity, you can as well cash it a bit more. ‘Related Posts’ are another great way of encouraging internal linking on your blog, where the audience gets to read content related to a specific topic. For example, if you just published a post ‘The best photo editing software in 2018’, you can link it to related posts such as the best free photo sharing websites and tips to edit your photos for free. WordPress’ Contextual Related Posts plugin is a great one to use for this: it automatically displays posts that are related to the current post, based on the post title and content. Focus on your blog’s user experience
There is no denying the fact that the user-experience of a blog or any other online resource should be the top priority of a website/blog owner. Only when your visitors glide through your pages, will they really mean to value the integrity of your resource. Here are a few pointers to help you upscale your blog’s user experience. 1. BreadcrumbsYou can set up a page navigation hierarchy on your blog pages so that blog visitors are able to figure out their location on your blog and the way back to where they started to surf. 2. Don’t pester your audience with dead links and pages on your blogThese are plainly irritating and mess up with the impression of your online resource, no matter how amazing it is. Dead links are a big turn-off for the audience. 3. Keep testingKeep testing your blog for any shortcomings, so that you can figure them out before your blog audience does. 4. Make your navigation seamlessMake navigation seamless so that your audience can move ahead with your blog the way you want them to. Hassle-free navigation ensures that your visitors will stay on your blog for longer, instead of getting frustrated and giving up. 5. Be smart with categorizationLet’s consider a scenario. If you are a lifestyle blogger, you will definitely be blogging about several niches under this large umbrella. It is always a good idea to not put up everything in a messy manner; instead, categorize it under different pages such as ‘Latest fashion’, ‘Celebrity favorites’, ‘Make-up’, ‘Latest trends’ etc. 6. Use a responsive designMake your blog responsive so that users can access it from all of their mobile devices. FYI, 60% of all internet access is made through mobile devices. You can tap into a larger share of online traffic by using plugins such as WPtouch that create a mobile-friendly version of your blog. Actively interact with your audienceIf you want a loyal reader base for your blog and also sustain the existing traffic, make sure that you interact with your active blog audience regularly. The comment section on your blog posts is the biggest source of audience downpour. Whenever they drop by to put forward their opinion, provide a feedback, or simply praise your latest piece of work, always post a reply. This is doubly applicable if one of your readers sends you an email or a query – don’t put off the reply. It will give your blog a big advantage if you’re seen as responsive and approachable, making your readers much more likely to share and recommend your blog. Make an attempt at guest bloggingThere are several debates pertaining to the success rate of guest blogging in driving traffic to a blog or website. Some think it’s worthwhile, others that it doesn’t work. However, the fact remains that guest blogging earns your blog authentic backlinks. These backlinks will benefit your blog’s SEO, leading to increased visibility and traffic, and can also boost your reputation among your blogger peers. Build an amazing email list and segment it wellA blog is driven by its subscribers and finding the right ones is quite a task. Building an email list is the right way to go about it. For starters, create an amazing sign-up form and put it up on a landing page so that people know what they are expected to do. Once you have leads, you can review email marketing services available in the market and make a selection. Once you have made the choice, you can begin your email marketing campaign to drive in traffic and leads. Promote your postsOnce you have put up all the blocks in the right places, the next crucial step up the ladder is the quest to promote your posts for good. A great promotion strategy involves well-rounded coverage in online spaces where your audience is present. Here are some ideas to get you started:
SEO is the game-changerDriving traffic to a blog is mainly about playing nice with search engines, and that could be done only through a well-thought-out SEO strategy. If you are new to it, installing the Yoast SEO plugin or the All-in-one SEO plugin can be your saving grace. Don’t forget to target the right keywords and use them naturally in the context of your content. Incorporating low-competition keywords is a good strategy if you can, but don’t go out of your way to crowbar these in, as it can easily mark your blog out as spammy and earn a penalty. Take-away:
Make your blog trustableDeveloping a trust factor with your audience always plays to your blog’s advantage in the longer run. A secure blog is better trusted by users and is open to monetizing opportunities. Installing an SSL certificate will provide that extra edge and secure your blog even more. You can use the WordPress AkismetAnti-Spam plugin to fight spam so that users don’t have to put up with rubbish and absurd comments when they are going through it. Badges and certificates are a great way to populate your blog’s trust factor amongst the online audience. They are reputation boosters and uphold your blog’s importance in the online viewpoint. Understand how your visitors use your blogOnly when you understand how your visitors interact with your blog, will you be able to take corrective steps for anything that isn’t working for your blog or is bringing down your traffic. Google Analytics helps you gain a complete understanding of the customer experience, search engine optimization, and marketing processes. Keep learningMost importantly, the vitality of your online blog is highly dependent upon the content that you put out for your audience to consume. It is not stupid if you run out of ideas or concepts. To prevent this from happening, keep learning and looking for new ways to drive traffic by presenting amazing content. Content is king – always! ConclusionBuilding up a blog readership and (more importantly) sustaining it takes time. It can be frustrating at times, too. But instead of being put off this amazing passion-driven profession, it is important to look for the right pieces of this jigsaw puzzle and precisely fit them together. We hope our ‘tell-all’ guide helps you drive the right amount of traffic to your WordPress blog so that you can monetize the opportunity well and be successful in the blogging sphere. Lucy is an experienced Web Developer and passionate blogger, currently working at WPCodingDev. Reach out to her for any query regarding WordPress website customization. from https://searchenginewatch.com/2018/03/22/how-to-drive-more-traffic-to-your-wordpress-blog/
1 Comment
The post Private Blog Network appeared first on Kanwar Manoria Digital. from http://kanwarmanoria.digital/private/blog-network/ from http://kanwarmanoria.weebly.com/blog/private-blog-network Back in 2014 my colleague Chuck Price published The 10 Best Ways to Generate Traffic WITHOUT Google here at Search Engine Watch. Much like the world of search and the perpetually updated algorithms of Google, the landscape of non-Google marketing sees techniques, platforms and priorities change over time. What hasn’t changed is the importance of understanding how to generate traffic without Google. Google is big, but it is not good to concentrate all your efforts into just one referrer. Recent data (from Shareaholic) sees search engines account for around 40% of website referrals. This compares to around 20% for social media – a smaller but notable chunk of potential traffic. These percentages are always fluctuating. And, of course, there’s more to non-Google traffic than social. I thought I’d use today’s post to update Chuck’s 10. As you’ll see, some methods are still around, some are absent, and others are more important than they were four years ago. I also want to throw in a new over-arching theme, by way of a question I believe is more important for content and search marketers now than it has ever been: Am I participating in the conversation? In short, you should be. The key to succeeding with the following 10 non-Google traffic sources is by honest participation and engagement, as opposed to spamming and dropping links to your website around the internet. It is a question we’ll return to throughout. 1. BlogsBlogging?! Nothing new here! I hear you say. Perhaps, but I want to deal with blogs first because for me they are the first step to ‘participating in the conversation.’ And, today, there is more to blogging than simply having a part of your website dedicated to regularly updated posts. OnsiteBlog posts on your site are great for non-Google traffic of course. You can publish at will and with more authorial control than you might get from an offsite blog. You can then use that content to entice visitors to come and read your posts via social channels etc. Guest postsBlog-writing is not a skill that only serves your own blog, though. Guest blogging is still a good way to further establish authority in your industry and to potentially get visitors of those blogs to click through to your site. Offsite blog platformsOffsite blogging platforms such as Medium are ever-improving the ways they promote articles (via email digests and at the foot of article pages) to users depending on the topics they choose to follow. Follow authors related to your niche and participate in the communities that exist there. CommentsDon’t have time to write a full post? You can also ‘participate in the conversation’ by adding to blog comments. Be sure to prioritize adding value to the page over merely leaving a link. The commenting engine we use on SEW, Disqus, allows commenters to have a weblink visible within their user profile when readers click their username. I’d argue it’s better practice to use this than dropping a URL in the comment itself. 2. FacebookSo you have a great piece of content – perhaps a blog post – on your website. Where are you going to share it? Facebook is still the biggest social referrer online. According to Shareaholic, more than 18% of website referrals were from Facebook in the latter half of 2017. This is a drop from the year before, but the wedge is still huge. There are more than 2.1b monthly active Facebook users globally. As Chuck notes, useful and fun content is the best type to share on the platform. And the best time to share on Facebook traffic-wise is around 12:00pm according to Revive Social. 3. YouTubeAlthough not as big on the social referral numbers as Facebook, I’ve included YouTube because it is still the second biggest social networking site globally with 1.5b monthly active users. Like Google, YouTube uses a vast number of factors when deciding how to rank videos. These include keyword relevance in titles and descriptions, number of views, comments, likes, shares, and backlinks. Going back to our participating in the conversation mantra, our ‘best practice’ aim with any YouTube content needs to focus on ensuring videos are valuable to those interested in your niche – whether from an entertaining or an educational standpoint (or both). Traffic-wise, it is expected for users to be able to click-through to additional relevant information via links in the description under YouTube videos. And it can be a great referrer. 4. InstagramI’m highlighting Instagram because in recent years it has risen to become the third most popular social channel (800m monthly active users) and it is still growing significantly as a referrer (up 890% between 2016 and 2017 according to Shareaholic). Of course, Instagram really lends itself best to brands with the potential to produce strong visual content. There is a heap of truth in the cliché that the platform is awash with pictures of food. It is an ideal place for chefs and restaurants to show-off their skills, use hashtags to align their posts with similar images, and to persuade viewers to click through to their website to find full recipes or directions to their establishment. It works for other brands too. And is a great platform for inviting your audience to participate. 5. PinterestPinterest, like Instagram, is highly visual. Again, for certain niches it can drive a lot of traffic. Shareaholic actually ranks it as the second best social referrer with 7.53% share in the second half of 2017. A majority of people who come to Pinterest are looking for shopping ideas – including for fashion, events and holidays. So it is a great platform for ecommerce sites in particular. You can even incorporate buy buttons directly into pins. From a traffic perspective it is clearly working too. Brands can embed URLs at the top of their profile page. Participation is also fundamental to the mechanics of the site, with users re-pinning each other’s pins to their own curated boards. 6. TwitterTwitter still holds its own as a leading social network and a key referrer of traffic. It remains a great place to follow and converse with others who occupy your niche. If the tweets you send are a valuable mix of insight, retweets, links to other relevant content and occasional links to your own site – then you should find yourself able to generate good traffic when you do the latter. But, again, valuable participation is key. Users will not follow you if your timeline is simply a stream of URLs to your site. Add to the conversations that occur there. And be sparing with self-promotion. 7. RedditReddit continues to be a great place to interact with relevant communities related to many sectors. How accepting the site is to redditors’ own links depends on the relative rules of each community and their moderators – with some being fairly open to it, others accepting a percentage of posted content to link out, and others not allowing it at all. I’d argue that the best subreddits are those that are more strict about not letting users flagrantly post links. I prefer the conversational/forum elements over the bookmarking aspect. New users need to devote time to adding to these communities and learning how they operate before even considering posting links back to your own site. But traffic can certainly be obtained from Reddit, particularly if the content you produce appeals to the unique wants of its users. 8. ForumsLike Reddit, forums are also great places to share your knowledge and to participate in the conversation. And like Reddit, you need to spend some time engaging with other users and learning about the protocol for linking out to relevant content before tentatively offering links to your own site. That said, forums can be great for gaining traffic. Fundamentally, users are not visiting such sites to be sold and marketed to – but many conversations do occur around looking for more information on products, services and answering questions. Does the content on your site offer such information? 9. QuoraOf course, questions and queries posted by web users can be a good opportunity for you to participate in the conversation and to offer up your expertise. Users aren’t just asking questions on Google and Facebook. Specialist Q & A sites such as Quora see users ask hundreds of questions and the community offer even more answers. See if your niche is being discussed, set up a profile page with a link to your site, and if you start answering these big questions knowledgeably and honestly, you might see users wanting to click through to know more about what you do. Again, participation should be the priority. Authority and visibility in your niche is a great win, and any traffic is a bonus. 10. EmailEmail remains a significant traffic source and is continually improving as a way to let your most engaged customers know about products, services, and new content that is increasingly tailored to them. It differs from some of the other methods already mentioned because if users are already signed up to your mailing list, it is likely they are more engaged with your product or brand – especially compared to, for example, someone you might be chatting to in a forum or on Twitter. Of course, you still need to offer value – and it’s best practice to do so at the outset of your message to not waste their time before enticing them to click through to your freshest and most relevant content. And this doesn’t mean you shouldn’t still be… Participating in the conversationAll the methods I’ve listed are great opportunities to share value with the online ecosystem. It is very likely that your business has a niche of followers online chatting and seeking information across a range of platforms. It is also very likely that you may have some unique perspective or insight about that industry which others will find of value. Participating in the conversation is good practice for ranking in Google, as well as driving traffic from other sources. And the more diverse the platforms you use, the more visibility you have across the board. from https://searchenginewatch.com/2018/03/21/participating-in-the-conversation-10-ways-to-generate-traffic-without-google/ Structured data is, at this point, a core SEO tactic. Not only does it remove a layer of ambiguity for search engines (they don’t have to infer what a piece of data is; you’re telling them outright), it’s also the engine that drives rich results, which are taking up an increasing amount of real estate in the SERPs. The advent of voice-enabled search is making structured data an even more important part of the search marketer’s toolset. In much the same way that structured data enables search engines to extract and reproduce rich data in the SERP, that same entity extraction and reproduction is at the core of voice search results. Unfortunately, implementing structured data via semantic markup can be time-consuming and frustrating. Until relatively recently, the only way to implement semantic markup was to do so inline, by adding HTML attributes from Schema.org to the existing HTML of a page. To do so at scale, this historically required making changes to page themes or templates, which could be a big development ask depending on the site’s setup. Plus, inline markup is by its very nature bound to the presentation layer: you couldn’t mark up pieces of data that weren’t on the page (with the exception of judicious meta tag use), and if two pieces of information weren’t close together on the page, it could be difficult, if not impossible, to link them together within a single itemScope tag. Happily, the days of struggling to wrangle our data into easily-marked-up forms are behind us: it is now possible to add structured data in mere minutes using JSON-LD. This markup is now fully supported by Google and Bing; in fact, Google recommends adding structured data via JSON-LD instead of inline for Merchant Center accounts. In the interest of clear and effective illustration, we’ll be using a fairly simple use-case in this first “Static JSON-LD section”. We’ll get more advanced once we arrive at “Dynamic JSON-LD”. Know that even the more advanced example is just the tip of the iceberg; almost nothing is off limits when it comes to the level of complexity that Google Tag Manager-injected structured data can support. Static JSON-LDStatic JSON-LD can be added to the <head> of the relevant page, or inserted using a plugin, but the easiest (and most flexible) way to implement it, in my opinion, is through Google Tag Manager (GTM). Step one: Write the JSON-LDIf you’re unfamiliar with JSON-LD, you may want to do some reading or take a quick tutorial to familiarize yourself with the basic concepts. Google’s Introduction to Structured Data is a good place to start. Depending on the schema type you’re using, schema.org may also have examples of JSON-LD markup for that item type.
Example JSON-LD for the Event item type on schema.org After the initial script tag, which tells the browser “this is a JSON-LD script”, you can see the hierarchy of our script:
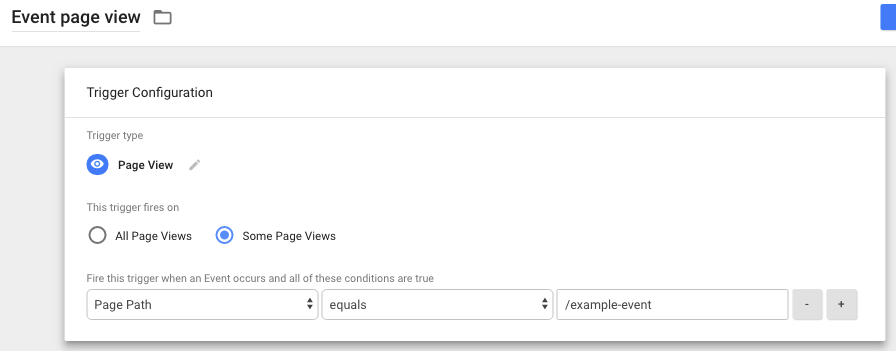
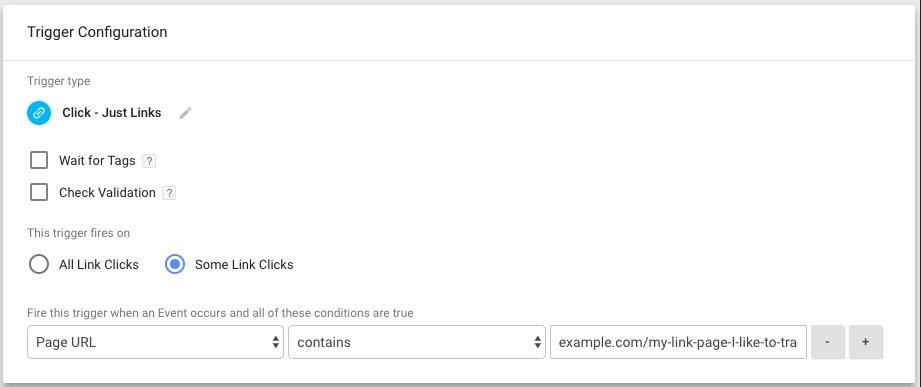
Note that when we’re referencing sub-types such as Place, we need to call that @type separately, and put that sub-type in its own set of brackets to indicate which nested properties belong to said sub-type. Don’t forget to put a comma after each property except the last one before an end bracket, or your code won’t parse properly (and it’s annoying to hunt through your code to find the missing comma)! Once you have your code written, test it in Google’s Structured Data Testing Tool to make sure everything looks good and you don’t have any missing required properties. Step two: Create a triggerIn Google Tag Manager, we want to create a trigger so that our JSON-LD markup tag will fire on the page we want it to fire on – in the example above, it would be on the page for the Typhoon with Radiation City event. Create the trigger:
Here’s what the trigger setup should look like Step three: Create the tagNow it’s time to create the tag that will fire on our target page and inject our JSON-LD structured data. Create the tag:
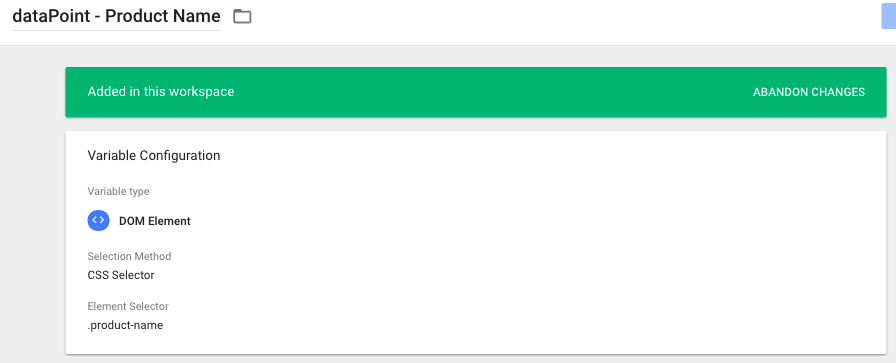
Here’s what the tag setup should look like Step four: Publish and testOnce you’ve published the tag, put the page URL back through the Structured Data Testing Tool to verify that Google can parse and understand it. Voila, you’re done! Dynamic JSON-LDIf you’re not adding new pages to your site every day, and the pages that are there don’t change that often, structured data via static JSON-LD may be all you need. For sites like e-commerce sites, which may have thousands of products whose price and availability may be subject to change, however, static JSON-LD just isn’t scalable. We need to get a little bit fancy. Step one: Create variables by CSS selectorSince we want this script to be dynamic, we’ll need to make use of GTM variables to find the pieces of data we need and give them names our script can understand. Create a new (user-defined) variable. In this example, we’re creating a variable to grab the product name:
Repeat this step for each property you need to pull in to make your structured data validate. Step two: Pull together in a function expressionUnfortunately, we can’t just pop our variables into our JSON-LD code and call it a day. Google Tag Manager inserts JavaScript to return its variables, and that JavaScript will invalidate our code. Instead, we need to wrap our JSON-LD IN a function expression that will pull out our variables first, then merge theminto a JavaScript object, and finally insert a completed JSON-LD script tag into the head of the page. The finished script in the Custom HTML tag (in GTM) should look something like this:
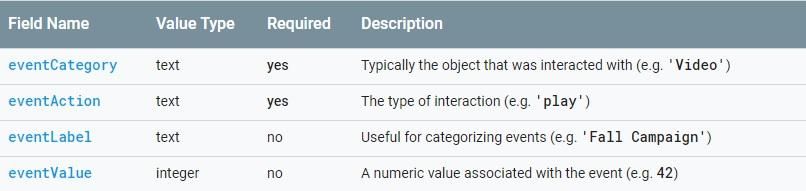
It may take a bit of tweaking and fiddling to get this to pull out your data exactly the way you want it; fortunately GTM’s Preview functionality will let you test as much as you need to before you deploy. JSON-LD markup and AMPUnfortunately, you can’t use GTM to inject JSON-LD structured data into AMP pages. GTM containers for AMP, like most things for AMP, are stripped-down versions of themselves. They don’t support the Custom HTML tag, or custom JavaScript variables, because they can take too long to load. If your site is using AMP, you may want to consider inline markup after all. Once you get this methodology under your belt, you’ll find that implementing structured data has gone from a time-consuming slog of adding inline markup and bothering your developers, to something you can create and deploy in minutes. Best of all, markup with JSON-LD fully validates, earns rich snippets, and is now supported by Bing as well as Google – so if you think it will work for your site, there’s no reason not to try it. from https://searchenginewatch.com/2018/03/20/how-to-implement-semantic-markup-using-google-tag-manager/ Event tracking is one of the most useful features in Google Analytics. With just a little bit of extra code, you can capture all kinds of information about how people behave on your site. Event tracking lets you monitor just about any action that doesn’t trigger a new page to load, such as watching a video or clicking on an outbound link. This data can be invaluable in improving your site. There are two different ways you can set up event tracking in Google Analytics. One way is to add the code manually. The other is to set up tracking through Google Tag Manager. Both methods are doable without a developer, although you may find it easier to use Google Tag Manager if you have no coding experience. How to set up event tracking manuallyWhat exactly is an event? Before you start tracking events, it’s important to understand how they’re put together. Each event is made up of four components that you define. These are category, action, label, and value. CategoryA category is an overall group of events. You can create more than one type of event to track in the same category “basket.” For instance, you could create a category called Downloads to group a number of different events involving various downloads from your site. ActionAn event’s action describes the particular action that the event is set up to track. If you’re tracking downloads of a PDF file, for instance, you might call your event’s action Download PDF. LabelYour label provides more information about the action taken. For instance, if you have several PDFs available for download on your site, you can keep track of how many people download each one by labeling each separate event with the PDF’s title. A label is optional, but it’s almost always a good idea to use one. ValueValue is an optional component that lets you track a numerical value associated with an event. Unlike the first three components, which are made up of text, value is always an integer. For instance, if you wanted to keep track of a video’s load time, you would use the value component to do so. If you don’t need to keep track of anything numerical, it’s fine to leave this component out of your event.
A table of the four components of an event. Source: Google Analytics Step one: Decide how to structure your reportsBefore you dive into tracking your events, come up with a plan for how you want your data to be organized. Decide which categories, actions, and labels you’ll use, and choose a clear and consistent naming pattern for them. Remember, if you decide to change the structure of your event tracking later, your data won’t be reorganized retroactively. A little thought and planning up front can save you a lot of hassle down the road. Step two: Connect your site to Google AnalyticsIf you haven’t done so already, set up a Google Analytics property and get your tracking ID. You can find your tracking ID by going to the admin section of your GA account and navigating to the property you want to track. Once you have your ID, add the following snippet right after the <head> tag of each page:
This code snippet enables Google Analytics to track events on your site. Replace GA_TRACKING_ID with your own tracking ID. Source: Analytics Help Step three: Add code snippets to elements you want to trackHere is the format for an event tracking code snippet:
After filling in the information that defines the event you want to track, add this snippet to the relevant element on your webpage. You’ll need to use something called an event handler to do so. An event handler is a HTML term that triggers your tracking code to fire when a specific action is completed. For instance, if you wanted to track how many times visitors clicked on a button, you would use the onclick event handler and your code would look like this:
You can find a list of common event handlers, as well as a more in-depth explanation on how they work, here. Step four: Verify that your code is workingOnce you’ve added event tracking code to your page, the final step is to make sure it’s working. The simplest way to do this is to trigger the event yourself. Then, check Google Analytics to see if the event showed up. You can view your tracked events by clicking “Behavior” in the sidebar and scrolling down to “Events.”
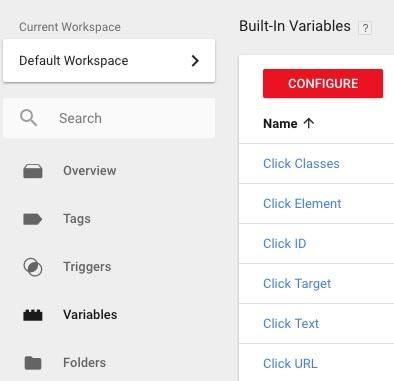
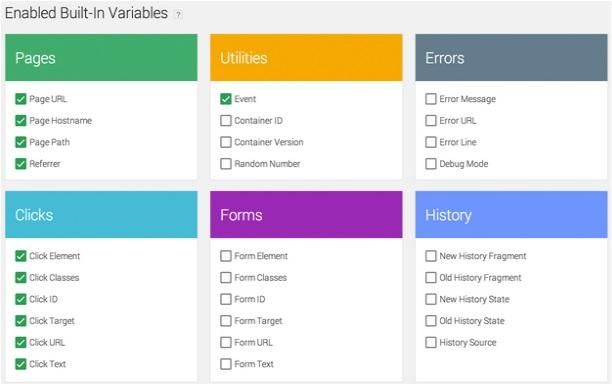
Your tracked events can be found under “Behavior” in Google Analytics. How to set up event tracking with Google Tag ManagerGoogle Tag Manager can be a little tricky to navigate if you aren’t familiar with it. However, if you’ve never worked with code before, you might find tracking events with GTM easier than doing it manually. If you have a large site or you want to track many different things, GTM can also help you scale your event tracking easily. Step one: Enable built-in click variablesYou’ll need GTM’s built-in click variables to create your tags and triggers, so start by making sure they are enabled. Select “Variables” in the sidebar and click the “Configure” button.
Enabling built-in click variables, step one Then make sure all the click variables are checked.
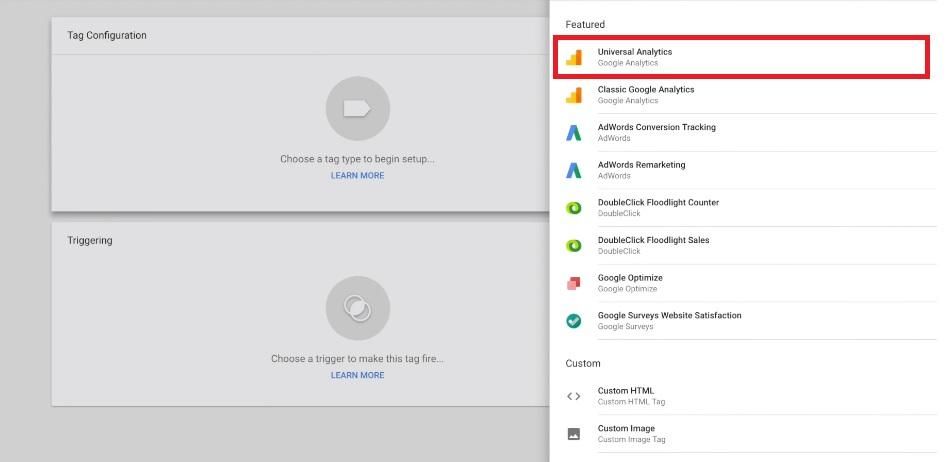
Enabling built-in click variables, step two. Source Step two: Create a new tag for the event you want to trackClick “Tags” on the sidebar. Then click the “New” button. You’ll have the option to select your tag type. Choose “Universal Analytics.”
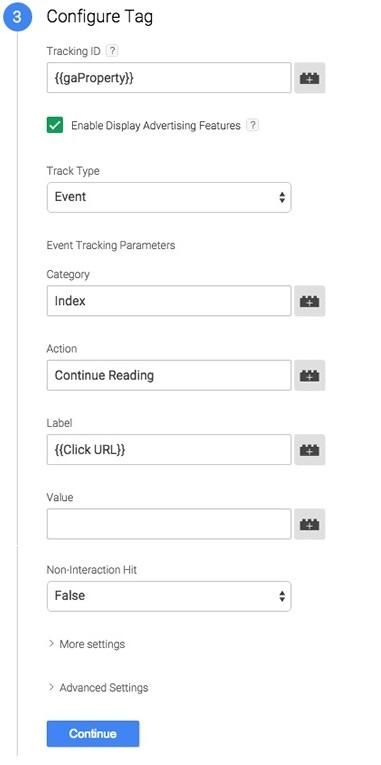
Creating a new tag in Google Tag Manager Step three: Configure your tagSet your new tag’s track type to “Event.” Fill in all the relevant information – category, action, label, etc. – in the fields that appear underneath, and click “Continue.”
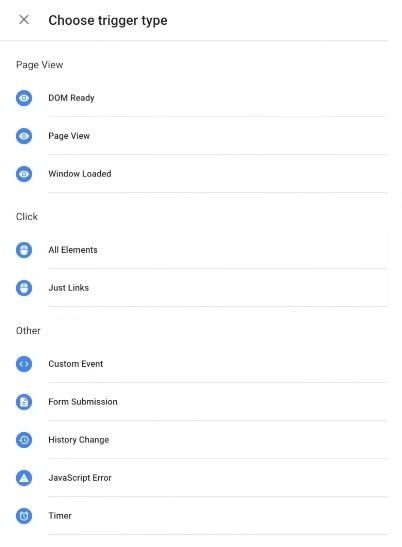
An example of how to configure a new tag in Google Tag Manager. Source: Analytics Help Step four: Specify your triggerSpecify the trigger that will make your tag fire – for instance, a click. If you are creating a new trigger (as opposed to using one you’ve created in the past), you will need to configure it.
Types of triggers that you can choose in Google Tag Manager
An example of how to configure a trigger. This one fires when a certain URL is clicked. Source: Johannes Mehlem Step five: Save the finished tagAfter you save your trigger, it should show up in your tag. Click “Save Tag” to complete the process.
A tag that is ready to go. Source: Analytics Help The takeaway and extra resourcesEvent tracking is one of the most useful and versatile analytics techniques available – you can use it to monitor nearly anything you want. While this guide will get you started, there’s a lot more to know about event tracking with Google Analytics, so don’t be afraid to look for resources that will help you understand event tracking. Courses like the 2018 Google Analytics Bootcamp on Udemy (which I used to help write this article) will give you a solid grounding in how to use Google Analytics and Google Tag Manager, so you’ll be able to proceed with confidence. from https://searchenginewatch.com/2018/03/19/how-to-set-up-event-tracking-in-google-analytics/ Approaching SEO for large ecommerce sites can be overwhelming. With more pages than you can even get your head around and issues like product variants, complex filtering systems and expired products, SEO for ecommerce sites requires a different kind of SEO strategy. Let’s be clear. All of the same keyword research and onsite optimization practices apply to ecommerce sites as they would for your standard brochure site. That’s the first step in the process, and we won’t cover those points here. However, for ecommerce sites, it’s necessary to take things a step (or ten) further. In this post, we share our SEO tips for large ecommerce sites. Optimization for ecommerce takes time, but we are also providing tips to help streamline the process without scrimping. Here goes… Ensure your site is on HTTPSSafety first! Although this falls under general optimization for all sites, switching to HTTPS is particularly important for ecommerce sites. With exchanges of personal details and users trusting you with highly sensitive payment information, security is of the utmost importance. As well as ensuring that your SSL certificate is correctly implemented, make sure to be transparent in communicating your security compliance to users. Provide detailed information on the steps you have taken to offer utmost levels of security, and display any relevant logos to demonstrate that you comply with certain security standards. Optimize category pagesNow that your website is more secure than Fort Knox, it’s time to focus on optimizing those all-important category pages. These are the pages on which to target those top-level keywords and should be high traffic generators. Category pages often flop due to issues with thin content. Text is frequently left by the wayside in favor of showcasing the products. However, this approach is potentially catastrophic in terms of rankings. It always pays to have at least a solid paragraph of copy to describe the category. To further bolster the ranking potential of your category pages, try to focus your link-building campaign on generating links to them. Since the category pages serve as gateways to your products, it is a good idea to prioritize these in your site optimization efforts. Optimize product pagesProduct pages can cause a real headache for optimization. The same issues often occur for the products pages as they do for the category pages – except there are tons more product pages to deal with. Think thin content, duplicate content, and non-existent metadata. A good place to start is with the product descriptions. Get into the habit of writing unique descriptions for each product. It can be tempting to copy and paste the description from the manufacturer, but this means placing duplicate content on your site. And that’s SEO suicide. SEO aside, don’t forget that these descriptions are fundamental in actually selling the product and increasing conversions. Try to tell a story with the description – make it interesting, enticing and in line with your brand personality. Speed up the process by devising a format for the product descriptions. For example, one format could specify a title, short description, bullet point list of features, and a final note on the product. This will ensure consistency and also speed up the content creation process for your writers. Consider including user-generated content on the product pages, including social media mentions and reviews. This will provide social signals, as well as helping to increase conversions and bring further unique content to the page. Don’t forget to write unique title tags based on careful keyword research. Again, it’s worth creating a standard format for these titles, for ease and consistency. Enticing meta descriptions may not help you rank higher but they will increase click-throughs from the SERPs. Try to include popular, eye-catching words or phrases, such as ‘free delivery’, ‘buy now’ ‘sale’, ‘reduced’ or ‘new’. If you have thousands of products then you’ll need to prioritize. You may be an SEO whizz, but you’re not Superman/Wonder Woman/insert superhero of choice. Adopt a top-down approach and start by optimizing the most popular products first. Product variantsOne of the questions we get asked a lot is what on earth to do about product variants. By this we mean different styles, sizes, colours and models of one product. If flicking between these different options generates a new URL for each variant, then you’ll be running into some serious duplicate content and keyword cannibalization issues. So what’s the fix? The best approach is to display options where the user can change the color, size or model but without the URL changing in the process. The exception to this would be if different colors or other variables are crucial to the product and will rank separately in the SERPs. Ultimately, though, you don’t want these pages to be competing with each other. If you do have different product variants, then be sure to canonicalize the main product version. ‘Purchase intent’ keywordsWe’re not going to provide a complete guide to keyword research in this post. But what we will say is this: be sure to include plenty of purchase intent keywords, e.g. ‘Buy [insert product]’. Users typing in such search terms are likely to be further down the sales funnel and therefore more likely to convert. Remember that SEO is not just about driving traffic; it’s about driving conversions, and therefore revenue. ImagesLet’s not forget the images: humans are visual animals at the end of the day. Deploy only the highest quality images to entice potential customers. Ensure product images are not too large or they could slow the page speed. Plus, don’t forget the importance of image search – add appropriate alternative text to all images. Be wary of filtersThe vast majority of ecommerce sites have some form of filtering system to help users find the products most relevant to them. Although these are super handy for the user, the trouble is that some filtering systems generate unique URLs for every type of filter search. What’s so bad about that? Well, it means that one site could have thousands and thousands of indexed pages, all with duplicate content issues. As a result, it can make your site look frighteningly like a content farm in the eyes of Google’s pet Panda. Check Google Search Console to see how many pages have been indexed for your site. If the number is unfathomably high then the best solution is to add a meta robots tag with parameters noindex, follow to the filtered pages. It will lead to these pages being dropped from the index, and you’ll no longer have to lose sleep over them. Expired or out of stock itemsOne of the key issues with ecommerce sites is that products come and go a lot. There’s no need to remove out of stock items from the site, as you could be missing out on valuable search traffic. Instead, leave the product page live, but specify when the product is due back in stock and provide similar options in the meantime. If a product expires and will no longer be sold then you’ll need to remove the page. However, do not forget to redirect the page! Set up a permanent 301 redirect for a newer version of the product, a similar product, or to the relevant category page. Site architectureProviding seamless internal navigation is essential not only for good user experience but also to help Google crawl and index your site. Ensure that categories are linked to from the homepage and that products are linked to from the category pages. Provide links to products in blog content in order to continue the user journey and funnel them towards making a purchase. Try to link any new products from the homepage, as it will increase their chances of being indexed quicker by Google and getting found faster by users. Breadcrumbs are also an important addition, as they ensure that every part of the user’s path is clickable. This helps users navigate back to parent categories as quickly and easily as possible. Plus, they also appear in Google’s search results, giving users an immediate overview of the site structure. Pay attention to URLsWith large ecommerce sites, it’s all too easy for URLs to get overly complex. Keep them clean and ditch parameters to ensure they are devoid of jumbled, nonsensical characters. Be neat and tidy by sticking to lower case letters, utilizing hyphens instead of underscores and keeping them short but sweet. Schema for product pagesAdding schema markup to your product pages is absolutely crucial for improving the appearance of your site in the SERPs. Enhanced results means greater click-throughs. There are two types of schema that you should add to your products: product schema and review schema. Each product page should use the same template and therefore have a consistent layout. This means you can add schema markup to the template using microdata and the schema will be generated for each new product page. Just make sure that you regularly test your schema using Google’s Structured Data Testing Tool, and if you’re new to it all, then utilize Google’s Markup Helper. MonitoringAs with any SEO strategy, you need to be continually monitoring and analyzing the results. This is even more important for ecommerce sites, due to the scale and constant changing of products. Stay on top of identifying broken links and error pages. Analyse what’s working and what’s not, note popular keywords and pages, and address those not performing well for organic search. For the best results, it’s always worth engaging in some A/B testing – whether this is for keywords, product description formats or images. There’s no doubt that SEO for large ecommerce sites is time-consuming. That’s why so many ecommerce sites don’t have the level of optimization they should, which presents a fantastic opportunity for those who are willing to put in the grind. Small, incremental changes can make a big difference. from https://searchenginewatch.com/2018/03/19/seo-tips-for-large-ecommerce-websites/ The post Testimonials appeared first on Kanwar Manoria Digital. from http://kanwarmanoria.digital/uncategorized/testimonials/ from http://kanwarmanoria.weebly.com/blog/testimonials4845596 If you already run an international website or have international expansion on your road map, there are several common SEO issues which can hold back your success. In this article we’ll look at six international SEO mistakes that you could be making, to help you look out for and avoid them on your site. DomainsOne mistake we see with people taking their first step into an international market is not considering the current domain they have. If you have a .co.uk domain name, for example, you will need to consider getting a new domain for each market you go into, as a .co.uk won’t perform as well in international search engines as it is a UK-focused ccTLD. IP servingThis is something which, from a development point of view, sounds like the perfect fix. Automatically redirecting people to the correct international version of your website based on their IP address, and so location, does sound really useful. In its truest form, IP serving cannot be overwritten and a user in a specific country will always be redirected to the site for that country. There are, however, a number of reasons why this isn’t always the right approach to take. Firstly, you can’t assume that all users in a particular location are from that country. If your IP serving can’t be overwritten by a user, this will mean that anyone in a particular country will be forced to use the site in that language/currency, which doesn’t then take into consideration someone who is travelling or not native to the country in question. This isn’t a great user experience. The second issue of IP serving is that it will affect your SEO, as search engines aren’t able to crawl your site from every country you may cover. As a result, you will find that your international sites won’t perform as well in the search engines as you would expect. On many occasions I’ve seen websites with IP serving being used which have real issues in their visibility, with the wrong website appearing in the search results. Google in particular, has real issues with this and I’ve seen local and US sites swapping in the search results on a weekly basis. I’ve also seen brands who use IP serving, having to buy local language ads in a market to make up for the fact that their local language site doesn’t show up in the search results. Below is an example of the US Calvin Klein website showing as the top search result for a brand search in Sweden. This is because they use IP serving, and Google is following this to the US site only.
Assuming English is OKAnother big issue for people taking the first steps into an international market is assuming English is OK for certain markets. Common assumptions in this area include assuming that English is OK for the Scandinavian countries, because they all speak English right? Depending on what the purpose of your website is, this approach might not work. For example, B2B brands looking to encourage people to make a large financial commitment, or high-end retailers, might want to avoid doing this. Generally, the more people are spending the more they will want to see content in their own language, they are investing in you, so you should invest in them. The other issue with this assumption is that the users in your international markets are more likely to be searching in their local language and not in English, so even if they are comfortable purchasing from you in English, they might not find your site as they will be searching for your products or services in their local language. Automatic translationMoving on from using English, some people think the easiest way to implement translation on a website is to use some form of automated translation tool. This is not recommended. Firstly, these translations, while often dictionary perfect, don’t necessarily reflect how people in any given market speak, they may also miss the nuances of search behavior which could result in you losing out on using words on your website which potential customers are using. For example, the dictionary correct German word for tickets (such as attraction tickets) is ‘Karten’ but we find there is often more search volume around this topic using the English word ‘Ticket’ in the German market. Another note on Google Translate as a plugin on your site; although the Google translate tool is super useful it doesn’t change anything on your website which Google the search engine will see. This means that the translated content it creates in every possible language, isn’t indexed in Google’s results and so does not help you to become findable in the search results when someone searches for you in Brazilian Portuguese, for example. Getting the language wrongThis is the worst-case scenario, and thankfully something I’ve only seen a handful of times to it’s worst extent. This is the process of completely missing the language you should be using. A few years back I was reviewing a website which was looking to promote its business into Hong Kong. The website was well put together, and all their SEO was in place and working well. The images were showing local people and the content was all in Chinese. The issue was that the content was all in Simplified Chinese. Simplified Chinese is used in mainland China. For Hong Kong, the target market of this website, the language should have been Traditional Chinese. Smaller less dramatic examples of this are forgetting that sometimes users are separated by a common language. Everyone knows the trite “differences” between English for the US and the UK (use of S or Z in some words and whether or not there is a U present in other words). There are other differences which you need to be aware of depending on the products you are selling. For example, Egg Plants vs Aubergines and Football vs Soccer. Hreflang tagsThis is one of the biggest areas where people experience problems with their international website strategy. In fact, John Mueller from Google said in February that Hreflang tags are hard! I’ve seen some humorous attempts at getting the tags right in my time, including people making up countries (Arabia for example) or trying to target an English language .eu domain to every country in Europe with something like 23 individual tags! There are number of things to watch out for with these tags, mainly around making sure you format the code correctly, don’t make up language and country combinations and that you aren’t linking through to pages which are different from those in your canonical tag, or broken pages! These are just some of the biggest fails I’ve seen over the years, but hopefully enough to give you a clue as to what you should be avoiding with your website. Like all SEO, when going international it’s important to make sure that things are right from day one but to keep an eye on things to make sure no issues creep in over time. Your international websites can help your brand grow and get more business, but only if they are set up correctly and nurtured. from https://searchenginewatch.com/2018/03/16/6-common-international-seo-fails-and-how-to-avoid-them/ If you love data (and what marketing expert doesn’t?), then learning Google Tag Manager should be high on your priority list this year. Unfortunately, many spend so much time on Google Analytics that GTM gets pushed to the wayside. Google Tag Manager (GTM) is a powerful, versatile tool that helps you track and manage your own website data. Since understanding analytics is increasingly important for businesses of all sizes, there’s no better time to start learning GTM than right now. So what exactly does Google Tag Manager do for you? In a nutshell, this tool lets you easily add snippets of code called tags to your site. These tags track things your visitors do. For instance, you could set up tags to track how many people download a specific file, which channels bring visitors to your site, and even how quickly visitors scroll through your pages. The tags then send your information to your third-party sites of choice, such as Google Analytics or Bing Ads. The GTM web interface is easy to use and requires no in-depth coding skills, so you can stay on top of your tracking without relying on your web developer to do everything for you. Getting started with Google Tag Manager isn’t always an intuitive process. You’ll probably want to seek out some training instead of trying to figure things out as you go. Whether you’re brand-new to this tool or you have some basic knowledge about it already, here are seven courses that will help you get the hang of GTM and take charge of your data. 1. The 2018 Google Analytics Bootcamp on UdemyIf you’re not sure where to start learning GTM, the 2018 Google Analytics Bootcamp on Udemy is a great place to begin. I’ve found that this course is unique among the many other Google Analytics courses out there because it doesn’t just teach you the basics of Google Analytics – it also shows you how to combine that tool with Google Tag Manager. GTM is essential for making the most of Google Analytics, yet many marketers don’t learn it until long after they’ve mastered the GA basics. Learning both together is a smart way to ensure you make quick progress right out of the gate.
The 2018 Google Analytics Bootcamp on Udemy will get you up to speed with both Google Analytics and Google Tag Manager If you know a little bit about Google Analytics already, but you want to start getting more out of it, you will most likely find this course helpful. You’ll learn how to set up a Google Analytics property the right way, read and understand reports, and track different kinds of data using Google Tag Manager. If you’re an intermediate-level marketer, some of this course’s Google Analytics information may be familiar to you already, but it’s still a great introduction to GTM. I was able to get this course during a Udemy sale for less than the original cost, and with the course you’ll get lifetime access to three hours of instructional videos, several supplemental resources, and a certificate of completion. Udemy has frequent sales, so if this price is a little steep for you now, keep an eye on the course – you may be able to snag it at a discount later. 2. Google Tag Manager Fundamentals course by GoogleIf you’re just getting started with Google Tag Manager, why not go straight to the source for information? Google’s own course provides a solid and comprehensive overview of using GTM. And like Google’s other analytics courses, this course is free. Just keep in mind that you’ll probably want to combine this course with at least one other. This will ensure you get a well-rounded perspective on GTM.
After you finish the Google Tag Manager Fundamentals course, you can brush up on your skills with some of Google’s other free courses 3. Google Tag Manager Essential Training on Lynda.comIf you’ve ever browsed through Lynda.com’s extensive library of tech-related videos, you probably won’t be surprised to learn that they offer a Google Tag Manager course. This course is just over two hours long and provides an overview of the most important aspects of using GTM, from creating containers to understanding the data layer.
Google Tag Manager Essential Training on Lynda.com If you don’t already have a Lynda.com subscription, prices start at $25/month. You may also be able to get free access to the site through your workplace, school, or public library. 4. Google Tag Manager YouTube Series by WeboqYouTube can be a great place to learn about almost anything, including Google Tag Manager. If you’re a beginner or intermediate-level marketer, you may find Weboq’s GTM playlist very useful, even though it’s not a course per se. This playlist starts with the basics and tackles more complex topics later on. If you want to learn to do something specific with GTM – like installing Hotjar or remarketing with AdWords, for instance – you’ll find plenty of specific, step-by-step how-tos here.
Weboq’s Google Tag Manager YouTube playlist starts with the basics 5. Google Tag Manager Tutorials on YouTube by MeasureschoolMeasureschool’s channel is another good resource for learning about Google Tag Manager on YouTube. There’s a lot of content here, directed towards a wide range of skill levels – beginners as well as advanced users will be able to find something helpful. This channel is updated with new videos regularly, so if you like the material, check back for fresh GTM tips and tutorials every week or two.
Measureschool publishes new Google Tag Manager tutorials on YouTube regularly 6. Master the Fundamentals of Google Tag Manager by CXLThis results-oriented course, led by marketing expert Chris Mercer, is designed to take you from beginner to proficient in GTM in just eight classes. Starting from the very first class, which walks you through setting up a tag, you’ll practice essential hands-on GTM skills. This course also gives you access to 10 video lessons that explain the more conceptual side of GTM, such as understanding what tags, triggers, and variables are. After you finish the course, you’ll get a certificate of completion. This course is on the pricey side at $299, but if you’re motivated and want to see results ASAP, it may be worth the cost.
CXL’s beginner-level Google Tag Manager course will get you up and running in eight classes 7. Google Tag Manager Workshop by LunaMetricsOnline classes are convenient and accessible, but sometimes, the ability to ask questions and discuss new concepts in person is priceless. If you learn best in a real-life classroom environment, LunaMetrics’ in-person GTM training sessions might be ideal for you. These day-long workshops are offered in major cities across the U.S., from Los Angeles to Boston.
Cities where LunaMetrics holds training sessions for Google Tag Manager, Google Analytics, and more. Source Prices start at $799 for a one-day workshop. While this isn’t a cheap way to learn Google Tag Manager, keep in mind that you’re also getting a unique opportunity to network with other marketers and collaborate while you learn – something that’s hard to replicate over the internet. Wrapping upGoogle Tag Manager is a must-have tool for every marketer and data-savvy webmaster out there. While it has a bit of a learning curve, GTM opens up tons of possibilities for tracking and improving your site’s performance, so it’s well worth putting in the time and effort to learn how to use it. Which of these Google Tag Manager courses are you going to focus on this year?
Amanda DiSilvestro is a writer for No Risk SEO, an all-in-one reporting platform for agencies. You can connect with Amanda on Twitter and LinkedIn, or check out her content services at amandadisilvestro.com. from https://searchenginewatch.com/2018/03/15/7-google-tag-manager-courses-to-prioritize-in-2018/ |
ABOUT MEPleasure to introduce myself I am Gillian 32 from Calgary, Canada. I am working as social media expert and have helped many clients with their social media marketing. Archives
July 2019
Categories |


 RSS Feed
